How to Use Facebook Groups to Grow Your Community and Increase Your Reach
Facebook Groups are the place to connect with other like-minded people and are becoming increasingly important for brands and businesses aiming to cultivate a community.

This story originally appeared on Buffer
Facebook has recently launched Groups for Pages, enabling the 70 million+ Pages on Facebook to create their own unique communities and feeds.
This update provides new ways for brands to boost engagement and could counter the decline in organic reach Facebook Page owners have been experiencing for the past few years.
More than 1 billion people around the world use Groups. And more than 100 million people see Groups as the most important part of their experience on Facebook.
Related: How to Make Your Facebook Cover Photo Stand Out
Facebook Groups are the place to connect with other like-minded people and are becoming increasingly important for brands and businesses aiming to cultivate a community.
So how do you create a Facebook Group? And more importantly, how do you build an engaged community in your Facebook Group? Let’s get started.
What you’ll learn in this guide
Here’s a brief look at what will be covered in this Facebook Group’s guide. Feel free to click on a section heading to jump to the respective section.
- Facebook Groups vs Facebook Pages
- How to create a Facebook Group that is “on brand”, attractive and easily discovered
- How to build an engaged community in your Facebook Group
Facebook Groups vs Facebook Pages
A common question on this topic is: “Should I have a Facebook Group or Facebook Page?”
And it’s a tough one because Facebook Groups and Facebook Pages are increasingly becoming more similar.
For example, an advantage that Facebook Pages used to have is the Page Insights, which allows social media managers to understand how their Page and posts are performing. Now, Facebook Groups include built-in analytics, too — Group Insights.
Here’s a quick overview of the positive features for each:
Facebook Page
- Built-in analytics (Page Insights).
- Call-to-action button (e.g. Sign Up, Book Now, Learn More) on your Facebook Page.
- Boost your Facebook Page and Page posts with Facebook ads.
- Like and comment as your Facebook Page.
- Add apps and services to your Facebook Page, so that your fans can easily order a product, make a booking, get a quote and more.
Facebook Group
- Built-in analytics (Group Insights) now.
- Set your Facebook group as private (Closed or Secret).
- Post documents, create polls and even buy and sell in your Facebook Group.
- Group chat with your group members.
- Members recieve notidications about new posts to the Group.
Now that you can link your Facebook Groups to your Facebook Page, maybe the answer to the question above is actually both.
In this post, we’ll focus on creating and managing a Facebook Group. If you wish to read up on Facebook Pages, you might like our guide on how to create and manage a Facebook Page for your business.
How to create a Facebook Group
Creating a Facebook Group is very straightforward. Let’s run through the important steps here:
1. Choose your Facebook Group name and privacy setting
To start, click on “Group” under the “CREATE” section at the bottom of the left sidebar on Facebook.

You can also find the same option under the drop-down menu in the upper-right corner of any Facebook page:

Next, fill out the basic info in the pop-up:
- Choose a name for your Facebook Group. (You can change this later.)
- Enter the names of friends you want to add or email addresses of the people you want to invite to your Facebook Group. (You have to add or invite at least one person.)
- Select the privacy setting of your Facebook Group (Public, Closed or Secret).

Here’s a quick overview of the differences between the three privacy options:

For example, a public or closed Facebook Group could be suitable for a community of your customers while a secret Facebook Group could be great for exclusive groups such as VIP customers or beta testers.
If your Group is public it’s also worth noting that anyone can see the posts and comments in your Facebook Group without having to join. If you want to protect the privacy of your members, a closed or secret Facebook Group will be more appropriate.
Once you’ve decided on the privacy options, hit “Create”.
You’ll be prompted to select an icon for your Facebook Group. If you don’t have a preference, Facebook will default to the generic Group icon ().
Now, you’ve set up your Facebook Group
But there are still a few more things we could do to make your Group more attractive to join and easier to discover…
2. Fill out your Facebook Group’s info
Head over to your Group settings, by clicking on the three-dots button below your cover photo and then choose “Edit Group Settings.”
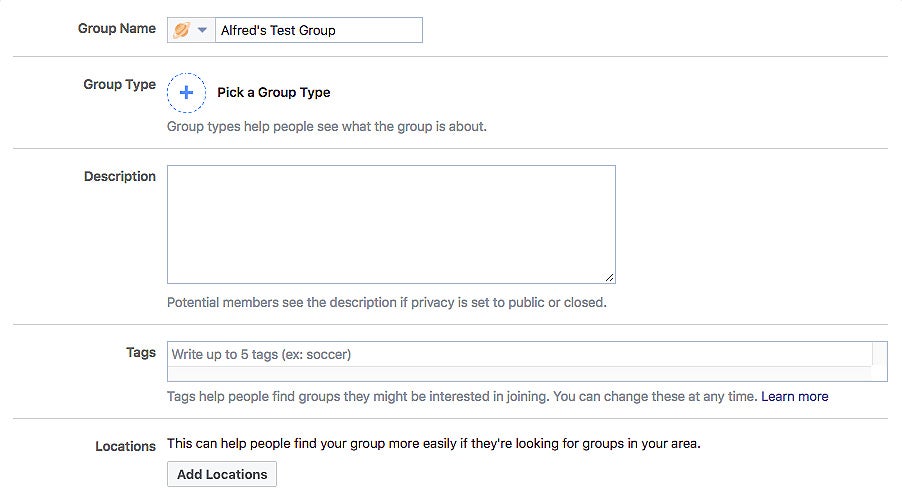
A best practice is to work your way down the list of and fill each out accordingly. Here are the key things to do:
1. Add a cover photo.
The ideal photo size is 820px wide by 462px tall.
On the desktop, Facebook will crop the cover photo a little from the top and bottom. On mobile, your Facebook Group name and details will overlay your cover photo. You can see an example and grab a template here.
2. Select a group type to help people understand what the group is about.
Here are the group types available:
- Buy and Sell (This group type has additional features.)
- Close Friends
- Club
- Events and Plans
- Family
- Neighbors
- Parents
- Project
- School or Class
- Study Group
- Support
- Team
- Travel
- Custom

3. Write a description to tell people what the group is about in more details.
You have up to 3,000 characters for your group description. (And yes, you can use emojis.)
It is common for group admins to use this space to share information that they want the entire group, especially new members, to know such as the dos and don’ts of the group.
Here’s an example from CMX Hub Facebook Group:

4. Add (up to five) tags to help people find your group.
For example, when I search “social media” on Facebook, Facebook groups with the “social media” tag will show up.

Once you start typing, Facebook will offer some suggestions such as this:

5. Add your location if you are a local Group.
It makes it easier for people who are looking for Facebook Groups in your area to find your Facebook Group.
You can add multiple locations if your group is present in a few places:

6. Customize your URL.
Using an easy-to-remember URL makes it easier to share your Facebook Group with others during meetups and conferences. You have up to 50 characters but I would try to keep it short.

3. Add or invite friends and promote your Facebook Group
Yay! Your Facebook Group is now ready to share, the next step is to invite more people to the group.
Add or invite people using the “Add Members” field on the right of your Facebook Group.

To add a friend, enter their name in the field. Your friend will join the Facebook group automatically without having to accept any invitation.
To invite a friend or customer, enter their email address. If you want to add a personalized note on the invite, click on the tiny blue icon on the right.
Here’s an example invite note:

If you are certain your invitees would love to be part of your Facebook Group, you can go ahead and add them. Otherwise, I would recommend inviting them and letting them decide if they want to join.
Related: How to Keep Up With Social Media Updates in 10 Minutes a Day
Tip: Share (or Buffer) your new Facebook group to your personal social media accounts and your Facebook Page, so that your close friends and customers know about your new community.
There’s a “Share” button just below your cover photo for you to share your Facebook Group to different parts of Facebook (e.g. timeline, Messenger and Page.)
You could use the Buffer extension (or your preferred social media scheduler) to share Facebook Group across your relevant social media accounts.

4. Link it to your Facebook Page
One great way to grow your Facebook Group is to link it to your existing Facebook Page.
Here are the advantages of linking your Facebook Group to your Facebook Page:
- It’s easier for your Facebook Page fans and visitors to find (and join) your Facebook Group.
- You can post, Like and comment as your Page in your Facebook Group.
- Your community can have a separate space to interact and build relationships with one another.
This is how it looks on HBO’s Facebook Page:

To link your Facebook Group to your Facebook Page, click on “Groups” on the left sidebar of your Facebook Page.
If you don’t see the “Groups” tab on your Page, go to “Settings” > “Edit Page” and add the “Groups” tab to your Page.

When you click on “Groups,” you’ll be prompted to link a group to your Page. Hit “Get Started.”
(If you have not created your Facebook Group, you can click “Create Linked Group” to start a brand new Group.)
A pop-up will appear for you to select the groups you want to link. Hit “Link” and then “Link Group.”

And you’re set!

Woohoo! Your Facebook Group is all set up and successfully linked to your Page. Now let’s look at how to build an engaged community.
How to build an engaged community in your Facebook Group
Having an engaged community can help strengthen your community members’ relationship with your brand. This brand equity can then influence their purchasing decisions.
Besides branding, a community can contribute to many areas of your business such as customer support, acquisition and product innovation, according to CMX Hub’s research.

Here are some tips you can use to build an engaged community in your Facebook Group:
1. Engage with your members regularly
Initially, when the community is small, there might not be many posts from your community members. It can be helpful to seed some relevant, helpful conversations on a consistent basis; perhaps two to three times a week.
For example, David Spinks, Founder of CMX, welcomes and invites new members to introduce themselves every Monday. He also regularly initiates discussions on topics in the community-building space.

A thoughtful way to go about this is to plan your posts in advance; perhaps with a calendar (you can grab a template here). For example, you could welcome your new members every Monday, initiate a discussion on every Wednesday and invite members to share their achievements on Friday.

Most importantly, I would recommend commenting on every post and answering every question in your Facebook group (at least initially). This helps to make sure your members feel heard and that they are getting value from the group.
This is a strategy that solopreneur, Daniel Di Piazza, used to grow his Rich20Something Facebook group to more than 17,000 members.
“I purposely create conversations all day on Facebook and I pretty much respond to everything. I do miss some for sure, but even if it’s something as small as an “awesome” or a “Like’ — that totally makes a huge difference,” he explained on our Science of Social Media podcast.
To free up more time to reply and engage with your community, you could schedule posts to your Group with Buffer or by using Facebook’s own scheduling feature.
2. Use analytics to inform your strategy
Once activities in your Facebook Group pick up, you might want to know how your community-building strategy is performing and how to improve it.
Here’s some great news for you: Facebook is rolling out Group Insights (Facebook Group analytics) to Groups with more than 250 members.
Group Insights can be accessed by clicking on “Group Insights” on the left sidebar.

Here, you can find out insights such as how your Facebook Group is growing, when your members are most engaged and who your most engaged members are.
Here are the metrics and insights you can get from Group Insights:
Growth details

- Total members and members growth
- Membership requests
Engagement details
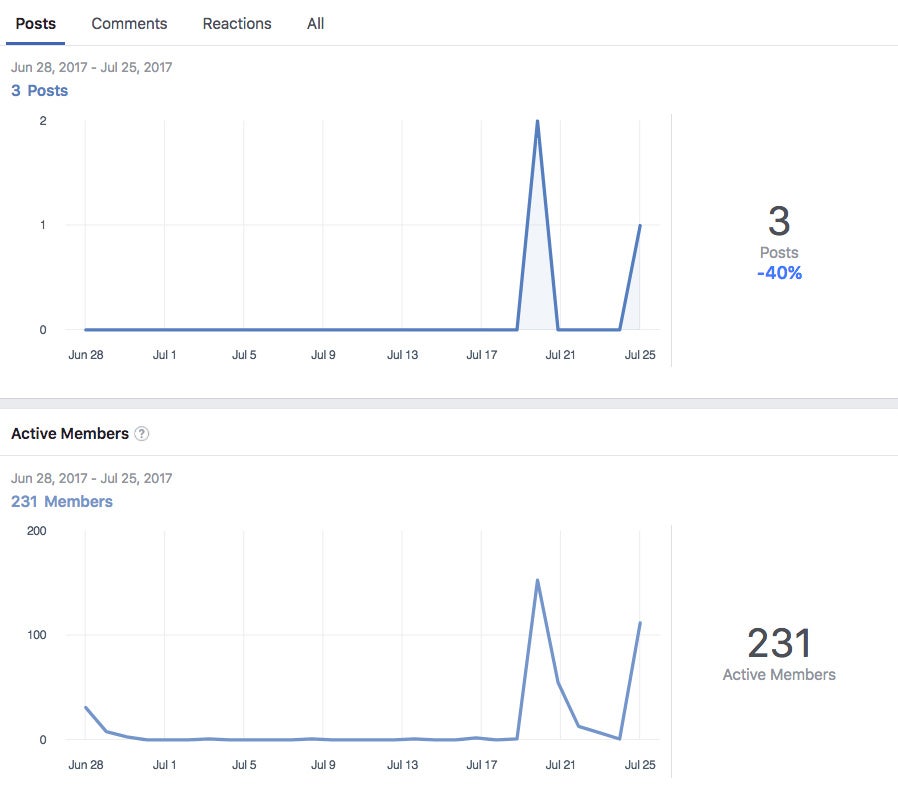
- Posts, comments and reactions stats
- Active members stats
- Popular days and times
- Top posts
Member details

- Top contributors
- Age and gender breakdown
- Top countries and cities
Use these metrics and insights to inform your community-building strategy. For example, you could post on days and times when engagement is high, track active membership growth and thank top contributors.
3. Host regular events
Hosting events is a great way to get community members involved (and maybe even attract inactive members back to the community).
In-personal meetups help to reinforce the connections made online, making the relationships more meaningful.
Here are some online and offline events you could host:
- AMAs (Ask-Me-Anything) with a community member or industry expert
- Q&As with someone from your company
- Talks and panel discussions
- Mastermind sessions or community discussions
- Casual get-to-know-each-other gatherings such as brunch, picnic, dinner, etc.
Once you have planned your event, create an event in your Facebook Group and invite members to attend.
To create an event, click on “Events” on the left sidebar and then “+ Create Event on the right.”

Fill out the basic information of your event to let your members know what the event is about and when it is happening. You can send an invitation to all your members (for groups smaller than 500 members) by selecting the option “Invite all members of (your group name).”

After you have created the event, you can invite more friends by clicking on the “Invite” button.

If you would like to learn more about engaging your event attendees before, during and after your events, here’s a guide on event marketing on social media by Eventbrite.
4. Form a group chat
Sometimes, you might want closer communications within your community. Posts in Facebook Groups are good for asynchronous discussions but less suitable for real-time, back-and-forth chats.
For example, you might want to discuss a particular post with the other admins and moderators. Or you want to let the group know you have reached your event’s meeting point.
You could form a group chat using Facebook Messenger for real-time, quick chats.
Related: How to Create a Stellar Social Media Marketing Plan for Under $100
This is generally more appropriate when you have a small group (and intend to keep it small) than when you have hundreds to thousands of members. Alternatively, you could form a group chat just for the admins and moderators.
To create a group chat, click on the three-dots option below your cover photo, and then “Send Message.” Select the members for the group chat (or “Select All” to select every member) and click “Start Chat.”

5. Set guidelines and moderate discussions
Here are some of the things you can do to keep your Facebook Group conducive for your members:
Set up guidelines. You can either write them in your group description, create and pin a post or create a Facebook document. You can include things such as the actions that are encouraged or should be avoided and the names of admins and moderators.

Edit your membership and posting settings. In your “Group Settings,” you can set permissions for new membership and posting. For example, you can set permissions such as if only an admin or a moderator can approve a new member and if all posts must be approved by an admin or moderator.
You can also learn more about new members by requiring them to fill up a short questionnaire before joining. You can ask up to three questions, and they’ll have up to 250 characters to answer each question.

Remove posts that violate the guidelines. You or your moderators can remove posts and comments on posts. I would recommend stating clearly in your guidelines the type of posts that are not allowed such as self-promotion and hateful posts.
You might want to consider removing and blocking repeat violators from your Facebook Group.

Facebook has recently launched Groups for Pages, enabling the 70 million+ Pages on Facebook to create their own unique communities and feeds.
This update provides new ways for brands to boost engagement and could counter the decline in organic reach Facebook Page owners have been experiencing for the past few years.
More than 1 billion people around the world use Groups. And more than 100 million people see Groups as the most important part of their experience on Facebook.


